Lenses and images

The lens equation relates the object distance, the image distance and the focal length: we derive that equation here. A converging lens brings rays together at the focus, as at right, and can make either real or virtual images. A diverging lens is usually used to produce virtual images. This page supports the multimedia tutorial Geometrical Optics.

Igniting paper at the focus of a lens

Converging lenses

A converging lens may be made with one side plane and the other convex, or both sides convex, as shown here. (It could also be concave on one side and convex with a larger curvature on the other.)
A plano-convex lens converging parallel rays
A biconvex lens converging parallel rays

Light rays refract at the interface between glass and air according to Snell's law. If the lenses are thin, the curved surfaces are often spherical, because this shape is easier to grind.

Focussing with a converging lens

Igniting paper at the focus of a lens

In this movie, nearly all of the light from the sun falling on a converging lens is focussed on a small image of the sun. The intensity of sunlight on a clear day approaches 1400 W.m−2, so here we are concentrating about 20 watts onto an area of less than a square centimetre of paper. Of course, the paper is losing heat by radiation (initially at low temperature and therefore slow) and conduction to a convecting layer of air nearby. This is less than the 20 watts input, so its temperature rises until the ignition point is reached. First, a hole the size of the image is burned, then the flame spreads across the paper. (We show ignition using a large concave mirror on Mirrors and images.)


Ray diagrams, the lens equation and the mirror equation

In the multimedia tutorial Geometrical Optics, we made a ray diagram using rays of light. 
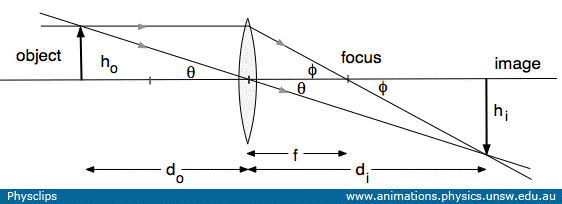
Below we show just a schematic, so that we can label the geometry and use it to derive the lens equation, i.e. we shall relate object distance do, image distance di and focal length f.

To start, we locate the bottom of the object on the optical axis of the lens, as shown, a distance do from the lens. A ray on the axis is undeflected, so the base of the image will also lie on that line. From the top of the object (height ho), we take one ray through the centre of the lens. This ray too is undeflected by the lens. Then we take a ray from the top of the object and parallel to the axis of the lens. By definition of the focus, this ray is refracted to pass through the focus. The top of the image is located where this ray intersects the other ray from the same point on the object. The intersection point determines both the image distance di and the image height hi.

ray schematic with converging lens
A ray diagram for a converging lens, used to derive the lens equation

Look first at the two right angle triangles having angle θ at the lens. These are similar triangles, so

    hi/ho  =  di/do .

which incidentally gives us the magnitude of the magnification. Then look first at the two right angle triangles have angle φ at the focus. These are also similar triangles, so

    hi/ho  =  (di − f)/f .

Setting the two expressions for hi/hoequal gives

    di/do  =  (di − f)/f  ,  which we can rearrange as:    1/do  =  (di − f)/di=  1/ f − 1/di

And that gives us the lens equation:

    1/do + 1/di  =  1/f  ,    or    1/(object distance) + 1/(image distance) = 1/(focal length)

If we replace this converging lens with a converging (ie concave) mirror, facing right, then the object would have to be on the right, and the rest of the diagram could be the same. So this equation works for lenses, too.

In more complicated examples involving two or more lenses, mirrors or combinations, it is helpful to use a cartesian convention for the distances and heights involved.

1/(object distance) + 1/(image distance) = 1/(focal length): an experiment

An experiment varying the object and image distances with a converging lens

In this experiment, an incandescent light bulb (foreground) is the object, from which light is focussed by the lens to form an image on the white screen (top left). Only a small fraction of the light from the bulb passes through the lens, so the image is not nearly as bright as the object, for this reason, we have . However, the image of the hot wire element of the bulb is clear. The image is real (light really does arrive on the screen to create it) and inverted. (The black cloth on the floor is to stop light reflected from the floor onto the screen.

For each position of the screen, the object is moved to the position that gives the clearest image on the screen. We then plot 1/(object distance) against 1/(image distance). We write the lens equation as

    1/(object distance)  =  −1/(image distance) + 1/(focal length)

In terms of this plot, the lens equation is y = (slope)x + (intercept), so the slope is −1 and the intercept is 1/(focal length). For this lens, we obtain a focal length of 20 cm.

A lens made of water

The next photo (thanks NASA) is out of this world. Taken on the International Space Station, using an approximately spherical mass of water as a converging lens, it shows an inverted image of astronaut Kevin Ford.

I suspect that the white objects at the bottom of the photo are a drinking straw and bottle. The surface tension of water is about 70 mN/m so, if the perimeter of the globe is about 0.2 m, the attractive force around that perimeter is only about 10 mN, constraining a mass of about 0.1 kg. We have seen in Oscillations that this force can set up three dimensional vibrations.

Links and further information

  • Chromatic dispersion, rainbows and Alexander's dark band
  • Dispersion and chromatic aberration
  • Microscopes and magnifiers
  • Mirrors and images
  • Newton's prisms
  • Reflecting Newtonian telescope
  • Refracting telescope
  • Snells law and refraction
  • The multimedia tutorial Geometrical Optics also has a longer list of support pages
  • Creative Commons License This work is licensed under a Creative Commons License.